Thursday, December 8, 2011

My Wednesday Night Turkey

Sometimes in the middle of the week it's good to mix things up a little. So last night I decided to roast a turkey. I have been asked more than once how to roast a bird so here goes from the beginning.

First if you're dealing with a frozen bird you want to pull it out of the freezer 3 to 5 days ahead depending on the size. If you want to speed up the thawing process you can give your bird a warm bath in the sink. It's best to use cold to luke warm water for this. If the water is too hot you can actually start cooking the meat a little and you definitely don't want to do that.

Once you're turkey is thawed you need to prep it. I take my rack from my roasting pan and put it in the sink so that I can prep my turkey on the rack and simply lift it to my roasting pan when I'm done. Unwrap your turkey, remove all the packaging, be sure t reach in and grab out the neck and giblets that are usually stuffed inside the turkey. I rinse my turkey off with a little cold water.

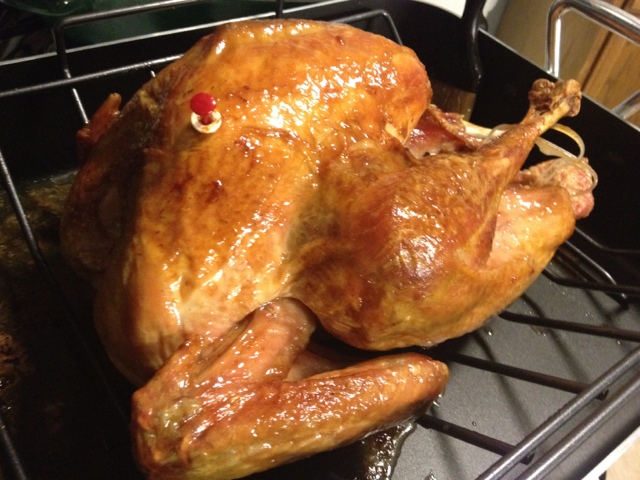
Everyone likes a tender turkey and I like my skin to be golden and a little crispy. Here's my secret, butter, Paula Dean would be so proud. There's a few ways to butter a bird. You can massage the butter into the skin. You can melt your butter and pour it over or baste it on. You can inject your turkey with melted butter in which case I'd baste the skin a little too to make it crispy. Finally you could just lift the skin and slide some butter underneath. All are good options. I usually just apply my butter to the skin because I don't want add to much extra fat to my meat. I stuff my turkey with apples and pears to keep my meat moist and to help my turkey cook evenly.

Now it's time to roast. Preheat your oven to 350 degrees. Remember the golden rule 20 minutes for every pound of meat. So for a 10lb bird that's 200 minutes or 2 hours and 40 minutes. I cook my bird uncovered for the first half to start my skin crimping and to get a nice brown color. Halfway through you want to either start basting or cover your turkey with foil to keep the juice in. If you choose the basting method you'll want to bast every 20 to 30 minutes.

When you're turkey is done take it out of the oven and let it rest for 20 to 30 minutes before carving.

Wednesday, December 7, 2011

Felt Christmas tree

So much fun for toddlers to decorate and redecorate. First start by folding your green felt in half then mark and cut your triangle for the tree. Next cut a long rectangle out of brown felt for the tree trunk. Finally cut a three or four inch strip of ribbon. Now get out your hot glue gun. Glue your trunk to the back of your tree. Fold over and glue the sides of the trunk to make a pocket for all your ornaments. Take your ribbon and make a loop, glue the ends to the back of your tree. Now get creative and make ornaments out of different colors of felt. To hang my felt tree I bought a reusable hook. I also use a bit of double sided tape on the back of my tree to help it lay flat against the wall. My kids love their new tree so much I'm thinking about making more of these as Christmas gifts.

Tuesday, December 6, 2011

An old wreath was given a second chance

This Christmas I decided to spruce up an old wreath. I bought a battery pack set of small LED lights. I attached the battery pack for the lights to the back of the wreath with twist ties. I wrapped the lights and just tucked in the loose end. I also added extra Christmas balls (it only had 5) and tada! It's a very traditional looking home made wreath!

I love my new Christmas tree skirt

To start with I bought a yard and a half of three colors of felt and two yards of a fourth. I chose dark green for the bottom layer so I got the most of that color. I started with my top layer first. I folded my old Christmas tree skirt in quarters and then did the same with my red felt. I lined them up and using my old tree skirt as my guide, I cut my red felt. I then folded my next layer of felt into quarters and using the red felt I'd just cut I cut my white felt about an inch and a half larger. I repeated this for my last two layers. To make my scalloped edges I used a CD as my guide and marked on my felt with a piece of chalk. You are bound to have two that don't line up just right use this as the back of the skirt. I scalloped the top three layers and left the bottom layer straight. To make sure everything lined up when I was ready to cut my slit I made sure my awkward spot where the last scallop lines up with the first was on the fold line where the fabric had been folded over to wrap around the bolt. I folded my layers again into quarters and used my CD to cut a circle for the center. I lined the tip of my folded over felt to the hole in the CD to make sure all my layers had the same size hole. Then I unfolded the felt and cut my slit right on the fold line stopping at the middle. To attach the layers together I used a hot glue gun lining up each side of my slit and then the center I glued the edges together. My tree never looked so festive!

Giant stockings

I wanted my children's stockings to be handmade by me. My stocking growing up was one that my mom had made for me. I also wanted their stockings to be a little larger than normal because I find myself struggling to find enough small items to fill a regular size stocking. I started by drawing my pattern out on a large shet of paper. When I was happy with the general shape and size I cut it out remembering to allow a little extra space for my seams. I used fleece. I was able to make 3 stockings from one yard of fleece. If you were making smaller more standard sized stocking you could probably get four out of a yard. I made a loop by sewing a small strip of fleece into the top outside corner of my stockings. I bought two yards of fuzzy white trim and one package of rik rak this amount was perfect for three stockings. Starting at the outside seem I used a hot glue gun to glue my fur trim and rik rak. My son was so excited when he saw them he said "Wow Mama look! Giant socks!"

Holiday door

Pinecones and ribbon make a beautiful holiday decoration for the front door. Use hot glue to attach the ribbon to the pinecones. I wrapped the ribbon around the stems. Once you have attached your first pinecone cut the ribbon a foot and a half to two feet long then attach a pinecone to the other end. I made four of these then tied them together at the top leaving a loop of ribbon to act as the hook. Then simply attach the bow to the top.